QuickBooks Integration
Overview
The QuickBooks Integration feature allows you to synchronize your iCraneTrax database
with your QuickBooks database, allowing you to maintain up-to-date information in
both applications.
You can choose to synchronize data either manually or automatically,
and you can select which fields to map between iCraneTrax and QuickBooks.
Account Administrators can access the QuickBooks Integration pages after clicking the "Settings" button in the toolbar.
QuickBooks Web Connector
In order to share data with QuickBooks, you need to install the free QuickBooks Web Connector.
The QuickBooks Web Connector is an application that transfers data between QuickBooks and online databases, such as iCraneTrax.
You can download it here:
http://marketplace.intuit.com/webconnector/
We recommend version 2.1.0.30 which is listed near the bottom of that page.
Manual vs Automatic Data Transfer
The QuickBooks Web Connector can automatically sync data at timed intervals, such as every 30 minutes.
Alternatively, you can choose to sync your databases only when you manually run the integration service.
Test Mode vs Live Mode
You can run the integration service in Test Mode to test your connection and database mappings.
No changes to your QuickBooks or iCraneTrax data will be made when you are in Test Mode.
You will also be able to see which customers will be synced between QuickBooks and iCraneTrax when you switch to Live Mode.
In Live Mode, your QuickBooks and iCraneTrax data will be modified.
It is recommended that you create a backup of your QuickBooks company file before running the integration service in Live Mode for the first time.
Setting up QuickBooks Integration - Step-by-Step Instructions
Set up your QuickBooks lists
In order to sync invoices between iCraneTrax and QuickBooks, you must create a custom item type in QuickBooks.
You can skip this step if you do not want to sync invoices.
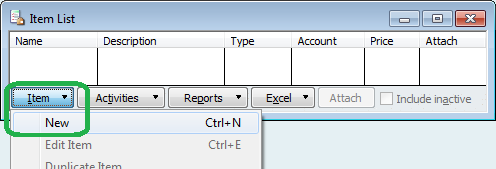
To create the custom item type, select "Item List" from the "Lists" menu.
In the window that opens, click the "Item" button, and select "New".
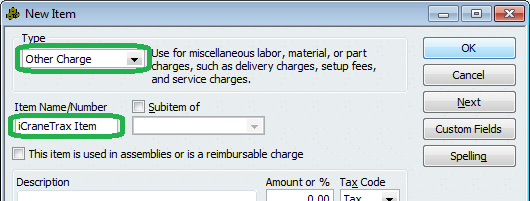
For the new item, set the type to "Other Charge" and set the name to "iCraneTrax Item", then press OK.

You also need to have two Sales Tax Codes named "Tax" and "Non", which should be set by default. To check, select "Sales Tax Code List" from the "Lists" menu.
Install the QuickBooks Web Connector
In order to transfer data between iCraneTrax and QuickBooks, the QuickBooks Web Connector (QBWC) is required.
If you don't have the QuickBooks Web Connector, it can be downloaded and installed for free from here:
http://marketplace.intuit.com/webconnector/
Open QuickBooks and open your Company File
With the QuickBooks Web Connector installed and running, open QuickBooks and make sure it is using the Company File that you wish to sync with iCraneTrax.
Add the iCraneTrax Integration Service to the QuickBooks Web Connector
From the iCraneTrax website, click the "Settings" button in the toolbar and navigate to the QuickBooks Integration page.
Then go to the "QuickBooks Web Connector Setup" page.
Select the desired update interval from the "Sync Data With QuickBooks" list.
If you select "Only when I choose to", then the QuickBooks Web Connector will only sync your data when you manually tell it to.
If you select one of the time intervals, the QuickBooks Web Connector will automatically sync your data.
For instance, if you select "Every 30 minutes", the QuickBooks Web Connector will sync your data every 30 minutes.
Manual Data Transfer

Automatic Data Transfer

After you have made your selection, click the "Create QWC" button.
The QWC file tells the QuickBooks Web Connector how to communicate with iCraneTrax.
You should see a dialog box asking if you'd like to save or open the file.
Select "Open".
The QuickBooks Web Connector should show the following window...
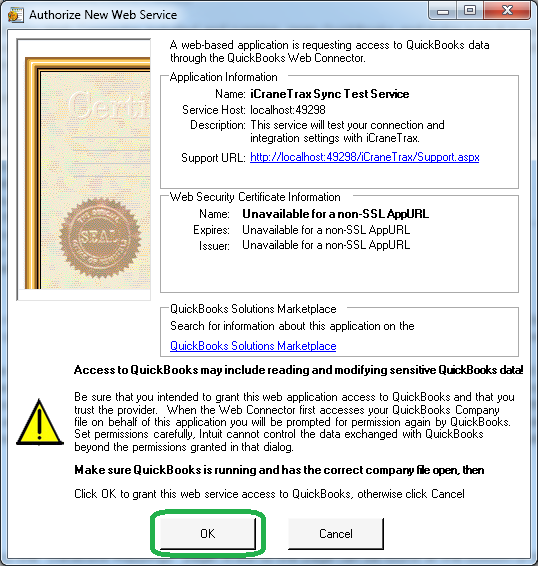
Press "OK" to allow iCraneTrax to access your QuickBooks data.
You should now see the iCraneTrax Service in the QuickBooks Web Connector.
NOTE: Running the service will transfer data between iCraneTrax and QuickBooks.
Before running the service, you need to set your database field mappings.
Set your Database Mappings
Navigate to the "Database Mappings" page on the iCraneTrax website.
This page allows you to choose which fields to sync between iCraneTrax and QuickBooks.
Once you're satisified with the database mappings, press "Save Changes", then you are ready to run the service.
Run the Service
Open the QuickBooks Web Connector.
If it is not already open you can find it by navigating to Start > All Programs > QuickBooks > Web Connector.
You should see iCraneTrax Service in the QuickBooks Web Connector.
First, enter your iCraneTrax password in the password box.
Then select the iCraneTrax service by placing a check in the box to the left of it.
To run the service, press the "Update Selected" button.

When you run the service you will see the QuickBooks Web Connector updating.
Once the service has completed you can review the updates.
NOTE:
The first two times you run the service, or any time in test mode, it will be slow because your entire customer database will be uploaded for comparison to your iCraneTrax database.
The service will be quicker after that because the two databases will have been synced.
View the Results of the Service
In Live Mode you should see that the iCraneTrax and QuickBooks data is synced.
In Test Mode, you can view the results on the iCraneTrax "Test Results" page.
The results page will show you the results of your most recent data sync with QuickBooks.
You can see which customer names match between iCraneTrax and QuickBooks.
Those matching records will be synced together when you switch to Live Mode.
The "Service Log" page will show you a list of all the times the service has been run.
It will also show any errors that occurred while running the service.